Maintenance > Paper Drawers > Adjusting a Paper Drawer to Hold a Different Paper Size

*
Adjusting a Paper Drawer to Hold a Different Paper Size

Return to Overview


If you want to load a different paper size into a paper drawer, follow the procedure described below to adjust the paper drawer guides.


Remark
  • Only A4 transparencies can be used. Make sure that the left guide is set to 'A4' when loading transparencies in a paper drawer. If transparencies of a different size (other than A4) are loaded in a paper drawer, the paper size and remaining amount of paper will not be detected correctly.

  1. Press and release the button on the paper drawer that you want to adjust. Grip the handle, and pull out the paper drawer until it stops. Remove all of the remaining paper.

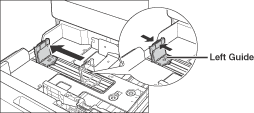
  1. Slide the left guide to align it with the mark for the desired paper size.

Slide the guide until it clicks.

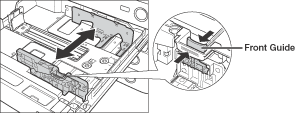
  1. Squeeze the lever on the front guide, as shown below. Without releasing the lever, slide the front guide to align it with the mark for the desired paper size.

Slide the guide until it clicks.

  • Adjust the guides correctly to avoid causing a paper jam, dirty prints, or making the inside of the machine dirty.
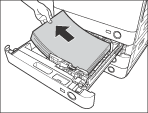
  1. Load the appropriate size paper into the paper drawer.
  • When loading paper, take care not to cut your hands on the edges of the paper.
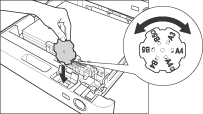
  1. Change the paper drawer's paper size plate to match the new paper size.

  • Some paper sizes listed on the paper size plate may not be used depending on the models and settings.
  1. Gently push the paper drawer back into the machine until it clicks into place in the closed position.
  • When returning the paper drawer to its original position, be careful not to get your fingers caught, as this may result in personal injury.

  • Back To Top