Access Stored Files > Booklet Mode
*
Booklet Mode

This mode enables you to print documents in such a way that the prints are made into a booklet.

For the Booklet Scanning mode of the Mail Box function, see [Booklet Scanning] in "Scan and Store."

  • Booklet

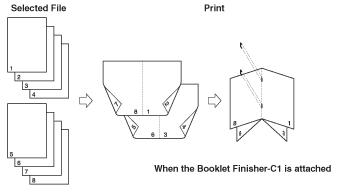
This mode enables you to print documents in such a way that the prints are made into a booklet.

  • Divided Booklet

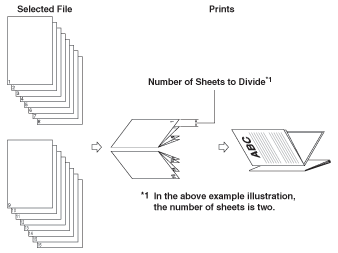
This mode enables you to make a multiple page document with a large number of pages into a divided booklet.

  • Creep (Displacement) Correction

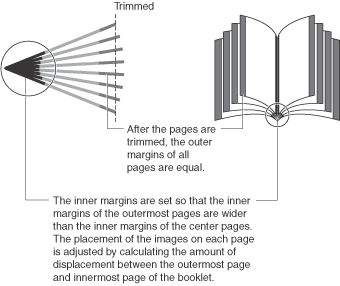
This mode enables you to adjust the position of the images in a booklet by calculating the width of the displacement between the outermost page and center page of the booklet.


Remark
  • For information on the modes which cannot be set in combination with this mode, see "Combination of Functions Chart."
  • This mode can be used only for printing a file stored in a mail box or a PDF file.
  • Saddle stitching is not performed if there is only one output sheet.
  • The Saddle Stitch and Divided Booklet modes can be set only if the Booklet Finisher-C1 is attached.
  • The accuracy of folds created in the Saddle Stitch mode may vary, depending on the type and quantity of paper.
  • When printing on special types of paper, such as heavy paper or transparencies, be sure to correctly set the paper type, especially if you are using heavy paper. If the type of paper is not set correctly, it could adversely affect the quality of the image. Moreover, the fixing unit may become dirty, or the paper could jam, and a service repair may be needed.
  • The Booklet Scan in Booklet mode can only be specified for the following paper sizes: A4, A4R, B5, B5R, A5, or A5R.
  • The Booklet mode cannot be set if multiple files are selected, and their record sizes are different.
  • If you want to print files for use as a booklet, we recommend that you scan the originals using the Booklet Scanning mode. (See [Booklet Scanning] in "Scan and Store.")
  • As an example, the procedure to select and print a file stored in a mail box is explained in this section.

  1. Select the desired Mail Box.
  1. Select the file that you want to print → press [Print] → [Change Print Settings] → [Options].
  1. Press [Booklet].
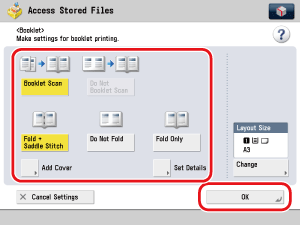
  1. Specify the booklet print settings.

  • Select whether to arrange the page layout of scanned data to make a saddle stitched booklet.

Details of each item are shown below.

[Booklet Scan]: Select to use each page of the image as one page of the booklet.
[Do Not Booklet Scan]: Select to fold each page of the image to use as two pages of the booklet.

If [Advanced Box], [Network], or [Memory Media] is selected in step 1, [Booklet Scan] in Booklet mode is set in the Booklet Print settings.

  • If the booklet finisher is attached, select [Fold + Saddle Stitch], [Do Not
    Fold], or [Fold Only] and specify whether to fold and saddle stitch.
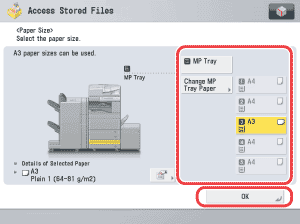
  • Press [Change] → select the paper source that contains the paper you want to use for the main document → press [OK].

If you selected the paper to use for the main document from [Change MP Tray Paper], select the paper size → press [Next] → select the paper type → press [OK].

  • If you want to add a cover, press [Add Cover] → select whether to print on the cover.

If you want to use the Booklet Scan mode, select [Print] or [Do Not Print] for <Front Cover>, <Front Inside Cover>, <Back Inside Cover>, and <Back Cover> → press [OK].

If you do not want to use the Booklet Scan mode, select [Print] or [Do Not Print] → press [OK].

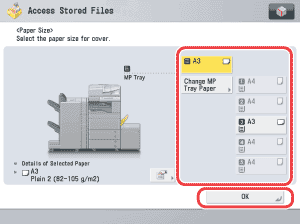
Press [Change] → select the drawer that contains the paper you want to use for the cover → press [OK].

If you selected the paper to use for the cover from [Change MP Tray Paper], select the paper size → press [Next] → select the paper type → press [OK].

  • You must select the same paper size for the cover page as that used for printing the main document.
  • If you select [Print] for only <Front Inside Cover> and/or <Back Inside Cover>, [Heavy] can be selected.
  • Only 52 to 105 g/m2 paper can be used for the main document, and 52 to 256 g/m2 paper can be used for the cover page.
  • If you are setting the paper for the cover page in the drawer, you must load the paper face up.
  • If you are setting the paper for the cover page in the multi-purpose tray, you must load the paper face down.
  • If you selected [Add Cover], the maximum number of sets that the booklet tray can hold is 10.
  • If you press , the detailed information of selected paper is displayed.
  1. Specify other Booklet settings.

If you are not specifying other Booklet settings, proceed to step 6.

  • If the Booklet Finisher-C1 is attached:
  • If the Booklet Finisher-C1 is not attached:

  • If the Booklet Finisher-C1 is attached:
  • If you select [Divided Booklet], enter the number of sheets that you want to divide by pressing [-] or [+] → press [OK]. You can also use the numeric keys to enter values.
  • The maximum number of sheets, including cover sheets, that can be saddle stitched is:
  • 16 sheets: 52 to 81 g/m2
  • 10 sheets: 82 to 105 g/m2
  • If the number of sheets is 17 or more, the booklet is not saddle stitched.
  • The number of saddle stitched booklets that the booklet tray can hold depends on the number of sheets that each booklet contains.
  • 1 to 5 sheets: 25 sets
  • 6 to 10 sheets: 15 sets
  • 11 to 16 sheets: 10 sets
  • If you select [Fold Only], only one sheet can be folded at one time.
  • If the printing position of the image is out of place, and you want to set the creep (displacement) correction, press [Creep Correction] → select [Auto] or [Manual] → press [OK].

If you select [Manual], press [] or [] to adjust the correction width.

  • To change the position of the saddle stitch, press [Adjust Stitching Position] → select the adjust size → press [OK].
  • If you set [Adjust Stitching Position] only if you select [Fold + Saddle Stitch].
  • IIf you want to adjust the folding position, press [Adjust Fold Position] → adjust the folding position → press [OK].
  • You can set [Adjust Fold Position] only if you select [Fold Only].

  • If the Booklet Finisher-C1 is not attached:
  • If the printing position of the image is out of place, and you want to set the creep (displacement) correction, press [Auto], or [Manual] → press [OK].

If you select [Manual], press [] or [] to adjust the correction width.


  1. Press [OK].
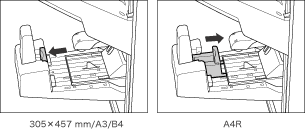
  1. Set the Booklet Tray guide to match the paper size.

  • Make sure to set the Booklet Tray guide correctly to match the paper size. Setting the Booklet Tray guide incorrectly may result in a paper jam.
  • If the Booklet Finisher-C1 is not attached, this step is unnecessary.

  • Back To Top