Problem Solving > Clearing Paper Jams > Fixing Unit (Inside the Main Unit)
*
Fixing Unit (Inside the Main Unit)

Return to Overview


If a paper jam occurs in the fixing unit area, a screen prompting you to remove the jammed paper appears on the touch panel display. Check the location of the paper jam, and follow the procedure described below, and the procedure that appears on the touch panel display, to remove the jammed paper.


Remark
  • The fixing unit and its surroundings inside the machine may become hot during use. When removing jammed paper or when inspecting the inside of the machine, do not touch the fixing unit and its surroundings, as doing so may result in burns or electrical shock.

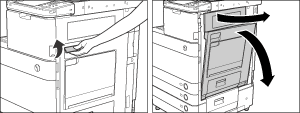
  1. Grip the handle, and open the lower right and upper right covers of the machine.

If the Paper Deck Unit-B1 is attached to the main unit, move the paper deck away from the main unit before proceeding with this procedure. For more information, see "Optional Products."

If the Copy Tray-J1 is attached to the main unit, remove all output paper from the tray. For more information, see "Optional Products."

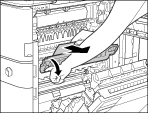
  1. Pull down the upper cover of the fixing unit by its tab, and remove any jammed paper.

After the jammed paper is removed, return the upper cover of the fixing unit back to its original position.

  • The fixing unit and its surroundings are subject to high-temperatures. When removing jammed paper, take care not to touch anything in this area, except the jammed paper and the upper cover.
  • If you cannot remove the jammed paper, return the upper cover of the fixing unit back to its original position, and then remove the jammed paper from the lower part of the fixing unit.
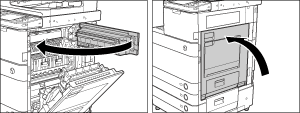
  1. Gently close the upper right cover and then close the lower right cover until it clicks into place in the closed position.

If the Paper Deck Unit-B1 was moved away from the main unit, reconnect it to the main unit. For more information, see "Optional Products."

  • When closing the upper and lower right covers of the main unit, be careful not to get your fingers caught, as this may result in personal injury.
  1. Follow the instructions on the touch panel display.
  • The screen indicating the location of the paper jam repeatedly appears on the touch panel display until the paper jam is entirely cleared. For more information, see "Screens Indicating the Locations of Paper Jams."

  • Back To Top