Access Stored Files > Print on Tab
*
Print on Tab

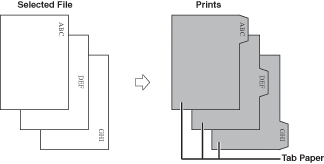
Load tab paper in the multi-purpose tray or paper drawer 2, and you can print onto the tabs using the Print on Tab mode.

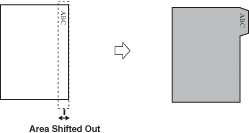
You must set how much the image on the originals must be shifted so that the image is printed onto the tabs.


Remark
  • For information on the modes which cannot be set in combination with this mode, see "Combination of Functions Chart."
  • This mode can be used only for printing a file stored in a mail box.
  • Only A4 originals can be used with the Print on Tab mode.
  • You can load tab paper in Paper Drawer 2 only if the Tab Feeding Attachment Kit-B1 is attached.
  • When printing on tab paper, check that the position of the tabs is correct.
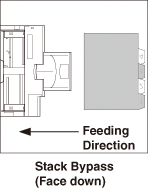
  • If you are feeding tab paper from a paper drawer, you must register the paper type in the paper source as tab paper beforehand. (See "Registering the Paper Type for the Paper Source.")
  • If [Unfinished Tab Paper Forced Output] in [Function Settings] (Settings/Registration) is set to 'On', the extra amount of tab paper sheets that were not required for the job are forced out of the machine.
    Example: If the number of tabs is set to 5 and the machine estimates that seven sheets of tab paper are needed for the print job, you must prepare two sets of tab paper each containing five tabs (10 total). Therefore, if the machine only uses seven tab paper sheets, three tab paper sheets will remain.
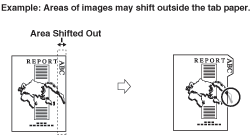
  • Areas of images shifted outside the tab paper cannot be printed on the paper, and may cause the following prints to have black streaks or appear dirty.
  1. Load the tab paper into the multi-purpose tray or paper drawer 2.

Make sure that the height of the paper stack does not exceed the loading limit mark ().

  1. Select [Tab] on the Select Paper screen → press [Number of Tabs]. Specify the number of tabs → press [OK].
  1. Select the desired Mail Box.
  1. Select the file that you want to print → press [Print] → [Change Print Settings] → [Options].
  1. Press [Print on Tab].
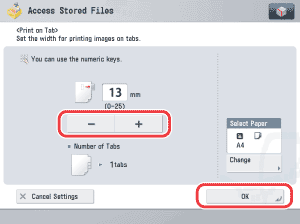
  1. Set the print shift width (0 mm to 25 mm) by pressing [-] or [+] → press [OK].

  • Make sure that the Number of Tabs shown on the touch panel display is the same as the number of tabs on the tab paper loaded in the multi-purpose tray or paper drawer 2.

  • Back To Top